Atmizoo Tripod RTA

Status
Not open for further replies.

ShowMeTwice

Supporting Member
ECF Veteran
Jun 28, 2016
18,759
1
125,070
the Universe • ∞
Nice thread Ange!!! :)

I absolutely love my Atmizoo Tripod's. :wub: The Tripod has awesome flavor and is very much on par with my kayfun's, Dvarw's or Pocket v2 rta's. It is very easy to build on and maintain. I've had mine since batch 1 was released (over a year) and have had zero issues. I vape mine MTL-RDL-DL (all depends).
IMG_1228cr.jpg

Ice matte w/3.4ml ext (batch 1) [L] + SS matte (batch 2) [R].

Building and wicking the Tripod is most similar to any of the modern Kayfun's. It has a very similar deck design to the K5 and also the KM3, Prime or KFL19.

I like to have my coil raised ~1.5 - 2mm above the AF. You can use the the cut outs on the rim of the deck for aligning your coil.
01coilH.jpg Here my coil is ~2mm above the center AF block.

02deckTop.jpg A simple 26g 316L coil at 0.45Ω. The Tripod has worked great with every type of wire I've used (simple round to claptons).

I have the 1.8mm AF pin installed on the one in the pic above. If using any of the air flow pins add juice around its o-ring before installing. Raise the post screws to install or uninstall the AF pins. They are easy to install/remove.

The AF with the basic Tripod kit does MTL (using a 1, 1.2, 1.5 or 1.8mm AF pin) to DL (4mm airflow wide open). Use the AFC at the base of the deck to dial in your preferred airflow. To further fine tune the airflow Atmizoo sells a Fixed Airflow Tubes Kit specifically for RDL/DL vaping. It includes five tubes with 2, 2.2, 2.5, 2.8, 3mm AF. I do not know if those work with the clones (if 1:1 they should).

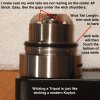
03wicked copy.jpg Wicking is easy on the Tripod (see pic for tips). The Tripod is wicked the same as a K5, KM3, Prime or KFL19. The wick tails should be just touching the bottoms of the juice wells (no more/no less). Trim the wick tails as described in the photo. For best performance you do not want the wells overstuffed with wick.

I like to make sure none of the wick is touching the center AF block. This prevents any juice from possibly seeping down the AF hole on the deck (same as a Kayfun). I make a gap under the shoulders of my wick. Simply move the wick shoulders away from the center AF block to get the gaps (see above pic). A paper clip, or needle, works very nicely for getting the gaps.

Wick. I use both rayon and cotton. With a 2.5mm ID coil I don't trim anything from the wick. Don't need to as the juice wells are large. I do lightly trim some from each of the tail sides when I use a 3mm ID (or larger). YMMV

Drip tip. The DT is a two piece assembly. You can unscrew it and use your own 510 DT's. If you do remove it leave the clear gasket inside of the top cap installed.

The Tripod uses JFC (juice flow control). To open the JFC simply rotate the glass tank section to expose your wick. Close it for filling the tank. Remember to turn the Tripod upside-down in order to remove the deck if you have juice still in the tank. See the manual (below) for details.

I would suggest trying it with, and without, the chamber reducer installed. You will be surprised. ;)

Tripod manual for specs, usage and other tips. Second photo lists the o-ring sizes.
IMG_1539.JPG....IMG_1535.JPG....IMG_1536.JPG....IMG_1537.JPG....IMG_1538.JPG

ETA: @Zazie, I haven't created a PDF tutorial yet for the Tripod however this will get you up and running.
 

AngeNZ

ShutterBug
Supporting Member
ECF Veteran
  • Mar 24, 2018
    11,223
    87,303
    New Zealand
    Nice thread Ange!!! :)

    I absolutely love my Atmizoo Tripod's. :wub: The Tripod has awesome flavor and is very much on par with my Kayfun's, Dvarw's or Pocket v2 RTA's. It is very easy to build on and maintain. I've had mine since batch 1 was released (over a year) and have had zero issues. I vape mine MTL-RDL-DL (all depends).
    View attachment 896733
    Ice matte w/3.4ml ext (batch 1) [L] + SS matte (batch 2) [R].

    Building and wicking the Tripod is most similar to any of the modern Kayfun's. It has a very similar deck design to the K5 and also the KM3, Prime or KFL19.

    I like to have my coil raised ~1.5 - 2mm above the AF. You can use the the cut outs on the rim of the deck for aligning your coil.
    View attachment 896741 Here my coil is ~2mm above the center AF block.

    View attachment 896743 A simple 26g 316L coil at 0.45Ω. The Tripod has worked great with every type of wire I've used (simple round to claptons).

    I have the 1.8mm AF pin installed on the one in the pic above. If using any of the air flow pins add juice around its o-ring before installing. Raise the post screws to install or uninstall the AF pins. They are easy to install/remove.

    The AF with the basic Tripod kit does MTL (using a 1, 1.2, 1.5 or 1.8mm AF pin) to DL (4mm airflow wide open). Use the AFC at the base of the deck to dial in your preferred airflow. To further fine tune the airflow Atmizoo sells a Fixed Airflow Tubes Kit specifically for RDL/DL vaping. It includes five tubes with 2, 2.2, 2.5, 2.8, 3mm AF. I do not know if those work with the clones (if 1:1 they should).

    View attachment 896747 Wicking is easy on the Tripod (see pic for tips). The Tripod is wicked the same as a K5, KM3, Prime or KFL19. The wick tails should be just touching the bottoms of the juice wells (no more/no less). Trim the wick tails as described in the photo. For best performance you do not want the wells overstuffed with wick.

    I like to make sure none of the wick is touching the center AF block. This prevents any juice from possibly seeping down the AF hole on the deck (same as a Kayfun). I make a gap under the shoulders of my wick. Simply move the wick shoulders away from the center AF block to get the gaps (see above pic). A paper clip, or needle, works very nicely for getting the gaps.

    Wick. I use both rayon and cotton. With a 2.5mm ID coil I don't trim anything from the wick. Don't need to as the juice wells are large. I do lightly trim some from each of the tail sides when I use a 3mm ID (or larger). YMMV

    Drip tip. The DT is a two piece assembly. You can unscrew it and use your own 510 DT's. If you do remove it leave the clear gasket inside of the top cap installed.

    The Tripod uses JFC (juice flow control). To open the JFC simply rotate the glass tank section to expose your wick. Close it for filling the tank. Remember to turn the Tripod upside-down in order to remove the deck if you have juice still in the tank. See the manual (below) for details.

    I would suggest trying it with, and without, the chamber reducer installed. You will be surprised. ;)

    Tripod manual for specs, usage and other tips. Second photo lists the o-ring sizes.
    View attachment 896751....View attachment 896753....View attachment 896755....View attachment 896757....View attachment 896759

    ETA: @Zazie, I haven't created a PDF tutorial yet for the Tripod however this will get you up and running.

    You have outdone yourself. Thank you :wub:
     

    ShowMeTwice

    Supporting Member
    ECF Veteran
    Jun 28, 2016
    18,759
    1
    125,070
    the Universe • ∞
    The genuine MTL drip tip looks nice, unfortunately I've no idea if it's compatable with the Ulton clone though.
    From a photo/info @Fredman1 posted in the shiny thread the DT on the Ulton looks to be the same as the authentic. Same 2 pieces. I would be surprised if the genuine MTL DT isn't compatible. It's pricey though. Any 510 DT will work on the Ulton.
     

    Fredman1

    Vaping Master
    ECF Veteran
    Mar 27, 2017
    4,052
    22,790
    67
    New Zealand
    The genuine MTL drip tip looks nice, unfortunately I've no idea if it's compatable with the Ulton clone though.
    Glad to say...a 510 drip tip fits perfectly on the clone. The tip fits loose into the cap only, but with the cap on the tank, the tip goes in solid.
    The white rubber seal inside the cap has to be removed though.
    IMG_20200718_144522.jpg
     

    Lalli

    Senior Member
    ECF Veteran
    Aug 16, 2018
    232
    411
    Ulton Tripod is a very nice and solid MTL- vape with the 1mm insert. If you get it get the tank extension kit too.

    But it has two flaws:

    Deck screws rust, very badly. I hope this issue is fixed in later batches.

    Some O-rings a little too thick for the atty to work properly. Its a pain to open the top cap or separate the deck from the tank. I changed O-rings to thinner ones (from some other atty) and it started working much better.
     

    Fredman1

    Vaping Master
    ECF Veteran
    Mar 27, 2017
    4,052
    22,790
    67
    New Zealand

    ShowMeTwice

    Supporting Member
    ECF Veteran
    Jun 28, 2016
    18,759
    1
    125,070
    the Universe • ∞
    Copied...chucking along better than before. I love SS wire. Thanks mate :thumbs:


    Brilliant post indeed :thumbs:
    You are most welcome and thanks mate. I love SS wire too. Pulled out my NarDA RDA the other day, it had a clean kanthal coil in it already. Took two hits, yanked it and popped in a SS clapton. Much nicer. :D

    My kanthal spools will be sitting in a box with a note stating "break open in case of very dire emergency". :lol:
     

    ShowMeTwice

    Supporting Member
    ECF Veteran
    Jun 28, 2016
    18,759
    1
    125,070
    the Universe • ∞
    Deck screws rust, very badly.
    I saw that on the FT forum. Wouldn't count on Ulton using better screws without increasing the cost.

    The authentic takes M2.5 x 4mm large pan head phillips post screws. Atmizoo sells them in both SS304 and steel core/nickel plated. Pretty sure one can find those elsewhere for lower cost.

    Using the steel core, nickel plated screws ensures:

    – better wire grip and better screwdriver grip on head, plus
    – tear and wear focused on screws (easily replaceable) rather than post threads.

    However this also requires:

    – regular preview / check for tear and wear on nickel plating plus
    – replacement of screws on regular basis

    SS304 screws offer peace of mind but a bit worse results on grip (coil wire).

    I have both types and both work well for me on my Tripod's.

    Fairly certain those should work in the Ulton as I understand it to be 1:1.

    ETA: M2.5 x 4mm screw search.
     
    Last edited:

    Mordacai

    Vaping Master
    ECF Veteran
    Jan 16, 2019
    4,235
    7,639
    UK
    I'll sort them out later today @ShowMeTwice, as they're either on the PC or the phone hidden safely at one side.

    But I can tell you for certain that 16.5mm × 1mm FKM o ring with a shore hardness of 75 works perfectly for sealing the top cap, gives just the right amount of friction compared to the one originally fitted and it doesn't bind.

    One of these days I will learn to put things where I need them and in a logical order. But isn't that supposed to be for lazy people? :D
     
    • Agree
    Reactions: ShowMeTwice

    Mordacai

    Vaping Master
    ECF Veteran
    Jan 16, 2019
    4,235
    7,639
    UK
    Okay folks, o rings for Ulton Tripod.

    16.5mm × 1mm - Top cap
    16.0mm × 1mm - Deck/Tank seal
    13.0mm × 1mm - Airflow control ring (×2)
    06.0mm × 1mm - Vapour chamber seal

    If you're feeling flush, definitely get hold of Viton (FKM) o rings with a shore hardness of 75. As they won't bind and they'll put up with a fair amount of punishment and last you a long while.

    And yes, you are correct folks. I haven't got round to the o ring size needed for the chamber reducer. But at least the most important ones are covered.

    I've got to measure the screws from one I've retrofitted with button head hex machine screws, as I've forgotten the length.
     
    Last edited:

    ShowMeTwice

    Supporting Member
    ECF Veteran
    Jun 28, 2016
    18,759
    1
    125,070
    the Universe • ∞
    Okay folks, o rings for Ulton Tripod.

    16.5mm × 1mm - Top cap
    16.0mm × 1mm - Deck/Tank seal
    13.0mm × 1mm - Airflow control ring (×2)
    06.0mm × 1mm - Vapour chamber seal

    If you're feeling flush, definitely get hold of Viton (FKM) o rings with a shore hardness of 75. As they won't bind and they'll put up with a fair amount of punishment and last you a long while.

    And yes, you are correct folks. I haven't got round to the o ring size needed for the chamber reducer. But at least the most important ones are covered.

    I've got to measure the screws from one I've retrofitted with button head hex machine screws, as I've forgotten the length.
    Nice job mate. :D

    By contrast here are the ones used in mine (authentic):

    18.0mm x 1mm NBR - seal o-ring/under the Top cap (you're calling it Top cap)
    16.0mm x 1mm NBR - deck (same as Ulton)
    14.0mm x 1mm NBR - x2 base (what you call airflow control ring)
    12.5mm x 1.5mm SIL70 - chamber reducer
    2.0mm x 1mm SIL70 - MTL AF pins
    6mm × 1.5mm SIL70 - positive post o-ring


    Not sure what you mean by the "06.0mm × 1mm - Vapour chamber seal". Here is the parts diagram. Please let me know which that is, thanks. :)
    parts.jpg

    I've ordered the clone so I can see, and note, any differences for myself. I will know how much of a 1:1 the Ulton is soon. :)

    As is typical with most of the clones the o-rings are cheap (keeping cost down) and, for lack of a better word, crap.

    There are also 3 custom sized gaskets used in the authentic Tripod. Those are only available via Atmizoo ( o-rings/gaskets ).
     
    Last edited:

    Mordacai

    Vaping Master
    ECF Veteran
    Jan 16, 2019
    4,235
    7,639
    UK
    @ShowMeTwice, the positive post o ring interests me. As it seems that the Ulton clone doesn't have one fitted.

    Is it possible for someone to upload a photo of it's installation? As I'm unsure as to where it should be fitted.

    As does it go in the cutout in the deck and then does the insulator go through it to create a seal? As I don't think that it goes on top of the insulator, as that wouldn't work.

    And by Vapour Chamber seal, I mean the joints between the Vapour Chamber and Top Cap/Chimney Extension. Hopefully that'll clear things up.

    But I notice that it's not mentioned at all in the genuine manual, so could someone confirm that the genuine is fitted with one there.
     
    Status
    Not open for further replies.

    Users who are viewing this thread